|
|

Beginning with version 7.1 you can set as background images of the following formats: JPG, BMP, PNG.
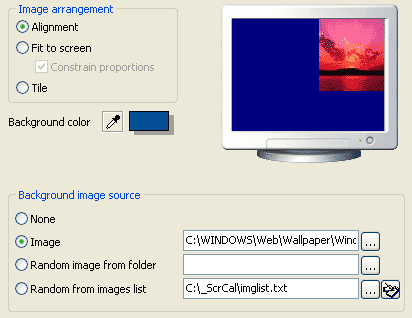
Image Arrangement on the screen
Select arranging image on the screen:
Alignment
Nine various alignment styles are available: centered, top left corner, bottom
right corner etc. Click just the monitor preview to choose one of them.
Fit to screen
Makes the image size for full screen. Check the "Constrain Proportions"
box to fit the image for full screen with saving original proportions.
Tile
Sets the image as wallpaper (tiled). You can set any background image or make
image as wallpaper (select "Background" in tree and click "Tile").
Also, you can see different wallpaper every time when you click "Update
desktop" or after Windows restarting. For it choose "Background"
in the dialog window and click "Random image from folder"or
"Random from image list". The choosing folder must include
any images for background. Also, it's possible to change the backround image
using Display Properties in the standard Windows' settings.
Background color
The color can be selected in RGB color model. The desired color can be achieved
by either supplying the exact color values or by choosing the appropriate color
from a palette.
Click the color sample to pick a color from a palette. The color picker window will represent the RGB mode palette.
You can use Eyedropper Tool to choose color exactly. Down mouse button on Eyedropper and move mouse on the screen area to choose the exact color by the eyedropper tool. Color changing will be shown in the color box. Return the Eyedropper tool to the start point to not change the color.
To change images with some period or at exact time see Changer.
Also you can Save or Print the current background image.
|
|
To edit image list click the suitable button and the 'Edit image list'
window will pop up.
To add any images (jpeg or bmp format only) into the list click the 'Add
image' button or use the 'drag-and-drop' operation (you can drag the file from
a window of any explorer). After that a preview of image will appear above the
image list in the editor window.
To add a folder with images into the image list click the 'Add folder'
button and browse the one.
To delete an image choose it in the image list and then click the 'Delete
image' button.
You can edit the image list in any editor. The image list must be a text file
each line of which is the file name with full direction to the one (for example,
C:/My_documents/Images/filename.jpg)